I was badly in need of a workbench, and my brother owed me help.
We got wood and miscellaneous supplies: ~$100 at Lowe’s.
Ten 2x4x8s, with two 4x4x8s for the legs and a 3/8 4×8 semi-finished plywood for the top.
Also, 2.5″ screws (for connecting 2x4s), 1.25″ screws (for attaching brackets and plywood), and some metal brackets (for attaching the legs).
The desired size of the table is 7.5×2.5′. Some of the design was sketched out on paper, some we worked out as we went along. We got the plywood cut at Lowe’s, and I have a jigsaw for the 2x4s, but the 4x4s had to be done with a hand saw. (Four of those cuts take about half an hour.)

Pile-of-wood stage. My brother in the center with the jigsaw, cutting out one of the long sides of the frame. On the ground next to his feet are the long sides of the lattice (note the notches cut out for the short sides of the frame). Standing next to that are two of the legs.

Plywood top (upside down) with part of the frame. The frame is a set of 2x4s around the perimeter underside of the top. The only thing attached here is the short-edge pieces (with small L-brackets), just so the top stays attached for the duration of the construction. In the end, the plywood will be glued to the frame.

Completed frame, plus a pair of 2x4s on their edges which will form the long sides of the lattice. (The same pieces in the shot with my brother, above.)
The lattice will rest directly on the 4×4 legs. Nothing in this shot is attached except the short-edge frame pieces.

Added cross-sections to the lattice and put it together.
All the structural connections are done with 2.5″ coarse drywall screws. We drilled 3/8″ holes through the outer piece of wood and 3/16″ holes through the inner piece, so that the screw cinches the two tight.

Lattice in place, and attached to the long sides of the frame via 2.5″ screws (7 each) from the inside of the lattice through the frame.

Legs cut out. Also, added some remnant scraps to the lattice where the legs will go to increase the surface area of the connection. Also, attached the ends of the long sides of the lattice to the short ends of the frame.
I have no power tool that’ll cut 4x4s, so was forced to hand-saw the legs. Worse, I wasn’t sure of the ideal height, so guessed on the long side, expecting the possibility of having to subsequently cut them shorter.

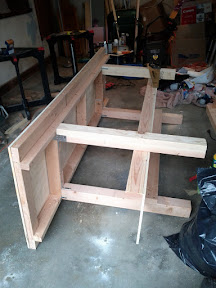
Legs attached with metal brackets. This is the weakest part of the construction, but should be fine since all the force is exerted down through the legs, not against the brackets.
This is the best shot to clarify the construction. There are four basic parts to it:
It’s worth noting that the main goals of the construction is to make the table strong without any screws where they would interfere with working (e.g. there are no screws going through the top surface).

Nowhere near done, but turned it right side up to answer:
1) Is it movable by one person? (Yes, with some effort)
2) Is it the right height? (No, as expected. Experimented putting some tools on the surface, and decided that it needed to be 6″ shorter.)
3) Is there a need for another set of legs (or one more leg) at the center? (No. The lattice is really quite stable.)

Back to construction – rear cross brace.

Side cross braces.

Bottom shelf. This is using the remnant of the 4×8′ plywood sheet, I just had to cut it down on the sides to fit between the legs.

Shelf mostly attached. This might seem upside down, but that’s deliberate. The shelf hangs off the back and side 2x4s so that they serve as edges for the shelf. That way, I won’t have things constantly falling off the back of the shelf.
The plywood is attached via a large number of 1.25″ screws. In this case, I didn’t bother drilling holes for them, so it was easy to put in a lot. (~20)

Front 2×4 brace. In hindsight, I should’ve made it the full length of the workbench, like the rear 2×4, but this should be sufficient. I’ll go back and fix it up if the shelf starts sagging.
I considered adding diagonal cross-braces at this point, but the table is very steady as is.
Shortening the legs (1 of 4 done).

Knot right in the middle of one of the cuts. Good times.

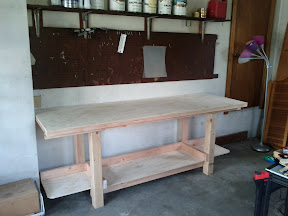
Legs even, bench right-side up and basically done. It’s quite stable, and rather heavy.
All that’s left is gluing the top to the frame and sanding the edges to prevent splinters.

I don’t have enough clamps to do the whole thing in one go, so I removed one side of the L-brackets at a time (remember, they’re the only thing holding the top to the frame) to lift the top to get in some glue and clamp.

Gluing the sides and back. Since this has to include the side edges, was forced to improvise heavy items. Would have gotten more clamps, but it was July 4th, and I don’t have the kind of patience it takes to wait a full day. Also, went over the rough edges with a rasp.
Done and in place.
Wall-clock time: 2 weeks.
Work-time: ~15 man-hours.
Beers consumed: ~6 (Beck’s Dark, Dos Equis, Sam Lager).
Two nights of work with my brother (getting the materials, making out the plans, cutting the legs and the frame and the start of the lattice), about a full weekend day putting the rest together, and a couple of short sessions gluing/clamping at 24-hour intervals.
(This post originally written here.)
0 Responses to “Oversized Workbench”