Archive for July, 2012

Sailor Pluto’s “Time Key” Staff Cosplay


Sundari-chan

Summary

This is a cosplay build/reminiscence for the Garnet Rod, also known as the Time Key: the key-shaped staff wielded by Sailor Pluto. It was the first cosplay thing I’ve made, so it’s quite primitive. Nevertheless, I’m happy with how it turned out, and I think it looks very authentic to the anime. I didn’t take many photos of the progress, so I’ll reconstruct the build as best I can.

Background

My wife started cosplaying in 2004, and her first cosplay was to be of Sailor Pluto. I offered to make the staff for her. At the time, we lived in a small apartment without many tools, but some friends of ours did a lot of cosplay, so I abused their hospitality and used some of their equipment. I built the staff over the course of a couple of months, coming over to the friends’ place on some weekends, working in our apartment at other times.

Planning

I printed an image of the staff full size, to my wife’s scale, on a bunch of sheets of paper taped together. I used an inconsistent scale – the height of the staff and its thickness are scaled to my wife’s height and width relative to the height and width of Sailor Pluto, respectively, rather than matching the same scale. I think this maintains a realistic approximation of the overall character design.

Supplies

Materials

The body of the staff is made of segments of 3/4″ and 1″ dowels, with 1/4″ steel rods to connect and strengthen. The balls are 1.5″ and 2″ diameter wooden balls I got at Michael’s, the key bits are 1/4″ plywood. The carved capital between the body and head is a piece of 4×4, and the curved head is a 1″ piece of oak (which was a pain to carve, believe me). The yellow spheres are marbles, and the red sphere is a christmas ornament.

Tools

For tools, I used our friends’ dremel, power sander and hand saws. I also bought a vise and attached it to a ramshackle wooden platform so I could take it around with me. Aside from that, all I used was a hand power drill.

The Build

Body

There are four dowels put together end-to-end, connected with the steel rods. The first step was to cut the dowels to length.

There’s one main long dowel, and then three short ones at the end, alternating between 3/4″ and 1″ to match the staff’s design. I sanded the very lowest one to taper it.

Dowel placement:

Note that the dowels go through the 1.5″ balls. The next step was to drill out those balls, with 3/4″ holes. This was pretty tough, and I broke about half the balls I tried to drill. Fortunately, they came in a fairly large bag.

Next, I drilled holes for the two steel rods. One went through the bottom set of dowels, the other through the top dowel, into the intermediate piece, and then up through the head of the key. The bottom rod goes through the bottom ball and juts out a little, so that when you rest the staff on the ground, it rests on metal.

Steel placement:

Drilling holes for the steel rods was the toughest task. I clamped the pieces in the vise, and took my time drilling and readjusting the alignment. For pieces that had to be drilled all the way through, I drilled separately from the two ends. Despite this, the holes weren’t perfectly aligned, but I tried to match angles when putting the thing together so the errors offset one another.

Once this was done, I drilled out the last (2″) ball to fit the rod and a bit of the last dowel through it, and attached the four pieces of dowel together. If I recall correctly, I used epoxy.

One more task for the body was to drill notches adjacent to each ball. To get a reasonably even pattern, I clamped the dremel in the vise, and then rotated the dowel against the blade.

Key Jigs

I cut the key jigs out of 1/4″ plywood, and attached them by dremeling out notches in the staff, then gluing the key bits with epoxy. This was pretty uneventful, aside from one moment when I drove a saw through my hand and used up all the earlier mentioned friends’ gauze. The epoxy has held admirably over the years. (And I had scars for a while, but can no longer find them.)

One of the few photos I have of progress:

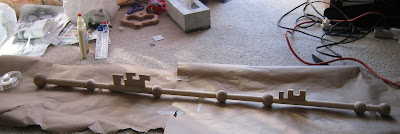
Staff body at the bottom, printed out schematic at upper left, head of the staff left of top center.

Capital

The carved part at the top of the staff was a pain. I made it out of a 4×4 piece of pine which I first sanded down to a tapered piece, then dremeled out to carve the grooved shape. It took forever, and the result isn’t terribly even, but it’s okay. I also drilled a hole all the way through this piece for the steel core.

Head

The head of the staff is a single piece of oak, hand-sawed, then sanded and dremeled to coerce it into the right shape. Quite tough work.

Attaching the capital and head

I attached the capital and head the same way as the bottom sections – steel rod through the center, glued together with epoxy.

Another random progress shot: trimming the steel rod to match the size of the head piece.

Gems

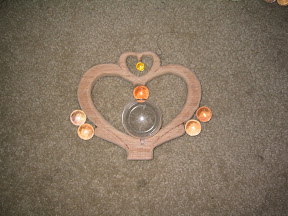
The red gem was easy — it’s just a christmas ornament painted on the inside. The technique was well known even at the time, and works nicely.

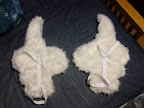
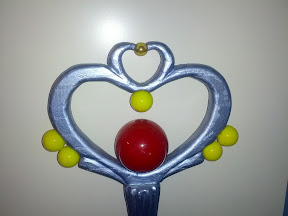
The yellow gems were a pain. First, it’s not easy to find plain-colored marbles. I eventually got some translucent-beige ones you see in the above photo. Fitting and attaching the small 1/4″ one was no problem.

However, attaching the 1/2″ large ones proved problematic. I tried a variety of glues (epoxy, superglue, etc.), but the marbles are heavy for their size, and the surface (even sanded down) doesn’t take glue well. They’d stick, but every time my wife would smack the staff against the ground (even lightly), the marbles would scatter everywhere. The third time this happened, I decided something tougher was needed.

To attach the marbles better, I decided to drill holes in them and use heavy guage wire (nails with the heads snipped off) to connect them. This meant I needed opaque marbles. I tracked down some yellow ones, but could only find the 1/2″ size, not the 1/4″, so now they don’t match. :/ If anyone finds a 1/4″ matching yellow marble, do please let me know.

Drilling was very tough. Even with a glass drill bit, I had trouble making headway, and a bunch of marbles cracked and split. Still, I was able to get it done.

Nail placement:

Gluing this together with epoxy worked out quite well, and none of the marbles have popped off since then.

Paint

The final step was to paint. (Actually, it was a couple of steps earlier, but logically the last step.) I used a nice blue metallic acrylic paint from Michael’s. Nothing fancy, and when you look close, you can see wood grain. From a distance, however, it looks perfect.
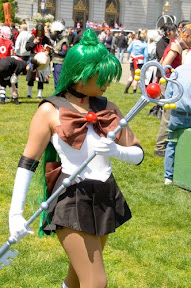
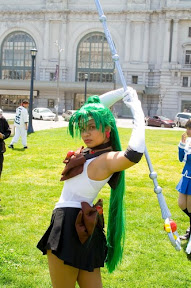
Photos


Sundari-chan

Sundari-chan

Dog Cosplay of Amaterasu from Okami

+

=


Photo by ~morgoththeone.

Summary:

Build blog for the costume for the wolf goddess Amaterasu from Okami, built for and cosplayed by my Samoyed dog Dante. Originally posted at my more general blog.

Before I proceed, a few notes for anyone who wants to cosplay their dog:

  • Only do this if the dog will enjoy it.

    • Photo by ~cheebang
    • Dante is exceptionally sociable. Many dogs are not, and may react adversely to being the center of attention. Some might get aggressive.
    • Dante doesn’t care about things being on him, perhaps because he’s bred to be a sled dog. Many dogs don’t like to be encumbered. You can desensitize a dog to wearing things, but don’t just shove a costume on a dog that’s freaked out by it.
    • Watch your dog’s body language in any unusual situation. Make sure they’re happy.
  • Keep the health of your dog in mind.

      Photo by ~octomobiki
    • Don’t leave a costume on for long. This can cause overheating and can tangle fur or cause it to become ingrown.
    • If it’s hot, provide water regularly, if it’s cold, don’t stay out for long, etc.
    • Don’t expose a dog to unusual stimuli for long. This will cause anxiety, even if it’s fun.
    • Don’t apply anything toxic to a dog. (We used food-coloring markers.)
  • Be careful and use common sense.
  • I do not recommend trying this with a cat.

Background

We have a Samoyed by the name of Dante. This is a breed that looks like small, fluffy, white wolf. We also occasionally cosplay. It was inevitable that we would come up with the idea of combining the two.

While planning our Otakon 2011 trip at the start of June, my wife semi-jokingly suggested bringing Dante. To our surprise, our roommates at the con were ecstatic at the idea. Since this was better for him than leaving him in a boarding place for five days, it was decided.

I then figured it would be a great time to do a costume for him. The Amaterasu costume was perfect. Not too complicated, not too heavy, and popular enough to be quite recognizeable.

Overall plan

I decided to do the wings, shield, flames, and paint. I did not do the clouds around the tail and paws. I couldn’t figure out a way to do either of those well without encumbring Dante’s movement or causing him discomfort. Given his general fluffiness, I thought that would be fine.

To attach everything, I decided to make a harness, and then anchor the costume parts to that. This way, it would be easy to put things on and take them off.

Harness

This is a balance between comfort and stability. I attached it to his neck, front legs, and stomach. The straps that attach to the legs hook to the main part with buckles, so they can be put on separately.

I then made a little saddle, using fur left over from my wife’s in-progress Felicia costume. It turned out that of all our fur remnants, that one matched Dante ridiculously well, to the point where several people asked how we managed to ‘shave’ him that well for the wings. The saddle is made out of fur just so if people catch glimpses of it, they can’t really tell it’s separate from him.

The main purpose of the saddle is to cushion his back so the shield and flames don’t rest directly on his spine, so it’s two pieces on either side of the center.

Wings

I first cut the wings out of foamie to get the shape right. I then took comparatively thick wire and bent it to follow the shape, and stapled it to the foamie (medieval, I know). This formed the base of the wings.

I then took the aforementioned Felicia fabric and cut out a pair of pieces for each wing, larger than the foamie cutout. I stitched them together halfway, inserted the foamie, then hand-sewed them shut the rest of the way. (I tried using the machine, and broke two needles on the wire. There’s just too much fur.)

At first, I was going to attach the wings to the leg parts of the harness, but after trying that, it became obious that this would be way too loose. Instead, I made the wings the leg parts of the harsess. So, they have a loop through which Dante’s front paws go, and the top buckles to the main body of the harness. These are hand-sewn on.

Finally, I did the swirling/cloud designs. I wanted to do this with thread, but that turned out impractical with the thickness of the two layers of fur + foamie. I ended up doing it with a sharpie, and am not entirely happy with the result, since when the fur moves, the lines get messy. I regret not stitching lines before putting the wings together, and am pondering redoing it.

Shield

I made the base of the shield out of pink insulation foam, on the general premise that lighter is better in this case. I cut the circle out with a small hand saw and sanded it on my table belt sander, then with sandpaper by hand.

I drew out the design based on a model (the only halfway decent reference I could find), then cut it out of 1/4″ foamie and glued it on with superglue. I primered the shield with spray primer before and after the application of the design (before to protect from glue, after to get ready for painting).

Amateur Hour

Around this point, I thought it would be a good idea to paint the back of the shield white, to make it blend in with Dante’s fur. So I sprayed it with flat white paint. This is one of those things that demonstrates just how amateur a cosplayer I am (several people have laughed at this). The spraypaint ate through the insulation foam, almost all the way to the front. :/ I painted over it with acrylic paint…

Flames

I decided early on to make the flames out of a foamie-wire-foamie sandwich (using 1/8″ foamie), so I could shape it in 3D. I went back and forth on what to use as a base. I started with a foamcore torus, but eventually switched to a foam disk. The wire is just embedded as deep into the disk as possible. The foam sandwich is sealed with superglue. The flames are cut out best as possible.

Somewhere around here, I painted the shield with green acrylic paint, and tried the whole thing on the dog. None of this is attached, but Dante was particularly tired out that day (we’d just come back from a dog park), so he was willing to hold still to verify everything was fine:

Painting the flames was a ton of fun. It turns out to be way easier than drawing a harness schematic.

I then glued the shield on. (Some paint touchup still to be done.)

Attaching the Divine Instrument

Finally, I needed to attach the harness and the divine instrument (shield + flames). I decided that magnets would be best, so I could snap the instrument on and off quickly as the situation dictated. I get magnets from kjmagnetis.com. I believe these are RC22CS-Ps.

I attached the magnets to the shield, then covered them with extra bits of foamie to fix them firmly in place and painted over those. (Yes, still using superglue.)

I then attached corresponding magnets to the saddle.

Face Paint

That just leaves the face paint. I looked it up, and there were two safe methods: food coloring and dye specifically tailored for dogs. I found food coloring markers that came in a variety of colors, so I ordered those.

Painting his muzzle was easy, because the fur is short. As the fur gets longer, though, it’s harder to draw clean lines. For the first outing, I just did his face, not his sides. The coloring smudges a lot when it’s wet, so be careful, but it’s pretty solid once dry.

Done!

And that’s it. It’s remarkably easy to put on – takes 5-10 minutes to do the face paint (and I’ve only done it once) and then 5 minutes to put on the costume, which is:

1) Put on collar and leash
2) Put on harness (two buckles – one around neck, one around stomach)
3) Slide wings over paws and attach to harness (two buckles – one on each wing)
4) Snap the divine instrument onto the harness (magnetic)


Photo by ~cheebang

Wall-clock time: 2 months
Build-time: ~19 hours
Cost: ~$50
Beers consumed: ~2.

For more photos take a look at my Amaterasu deviantart gallery and photos of this cosplay in others’ albums.

For other photos of Dante, friend him on facebook: facebook.com/dante.kogan.


Follow me on Facebook

facebook.com/VolkodavCosplay