 |
  |
Summary:
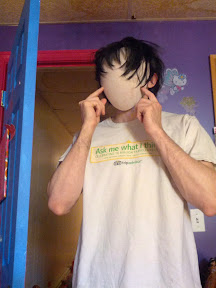
Tutorial for the mask worn by Hei (BK201) from Darker Than Black, made out of Bondo resin. It’s tougher and smoother than paper-mache, and takes hours to make rather than days (not counting painting time). However (or ‘Plus’), it involves working with toxic materials.
Background:
For Fanime 2011, I made Hei’s costume and dagger. I also made a mask out of foamie, using heat to shape it. It was a dismal failure. Since I had no new costume plans for Fanime 2012, I decided to remake the mask.
There are copious tutorials for making such a mask out of paper-mache (this one seems fine). But that takes several days due to drying times. I didn’t have several days, so I decided to follow more or less those instructions, but with Bondo.
Materials:
Building material:
bondo (with hardener)
putty knife (a small flexible one to spread bondo with)
stirrer sticks (something to mix Bondo)
scrap paper (somewhere to mix Bondo)
disposable scoop (something to scoop Bondo out of its container)
latex gloves (don’t touch Bondo when it’s liquid!)
respirator (don’t breathe Bondo when it’s liquid!)
a place to work (a garage will do)
Everything else:
party baloon
measuring tape
sandpaper (preferably also a power sander)
paints (spray and/or acrylic, your choice)
sharpie (for drawing on the balloon)
dremel (to cut out the eyes)
hand file with triangular cross section (to shape the corners of the eyes)
Note! In the comments, Monterey Jack points out that Bondo heats up when setting, and can pop your balloon. If one balloon doesn’t work, it may be worth trying a different type.
Build:
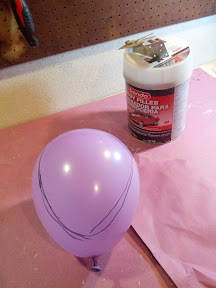
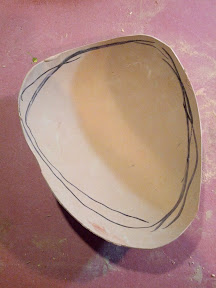
Measure
Measure your head with the measuring tape. Inflate the party balloon to more or less that diameter. Draw out the approximate outline of the mask on the balloon with a sharpie.
Base layer
Don your gloves and respirator and crack open the Bondo. You’ll need someplace to mix (I use scrap construction paper) and something to mix with (I use wooden stirrers). Mix a small amount of putty and hardener, as big as a golf ball. Follow directions on the can for the ratio.
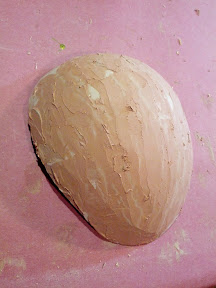
Slather the Bondo mixture onto the balloon using the putty knife, going an inch or so beyond your mask outline. Don’t worry about the result being even. You have about five minutes to work with each batch after you start mixing. As soon as the Bondo mix starts beeing cottage-cheesy, STOP. Throw the rest of that batch away, and mix a new one. You’ll probably have to mix 2-3 batches to cover the mask area.
You should end up with something like this:
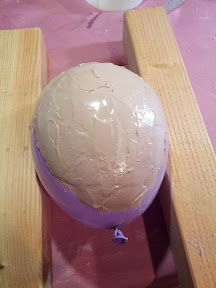
(When I did this, I rather wondered if the Bondo would eat through the balloon, like it does with insulation foam. It did not.)
You’ll want to prop the balloon up so that it doesn’t roll Bondo-side down. I used some scrap wood, but whatever you have handy will do.
Wait 30 minutes for the Bondo to fully harden.
Structural layer
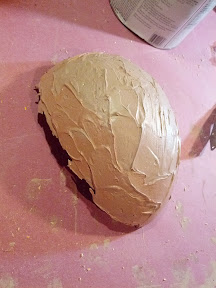
Apply a second coat. Slather the Bondo on liberally, especially near the edges of the mask-to-be. Wait another 30 minutes.

Pop!
Pop the balloon (fun!):
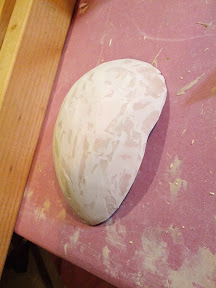
Peel the balloon off the mask (it should come off easily).
Sand
Make the first sanding pass. If you have a power sander, use it. A table belt sander with 80 grit or rougher works great. Hand-sand if you must, but it’s going to suck. With a belt sander, this should take you ten minutes. By hand… maybe an hour.
Aim for around 2/3 of the surface to be smooth. If you try to keep sanding after that, you’ll weaken the mask, or even sand holes in it. The result should have a smooth outer surface, and some rough valleys.
While you’re at it, sand the mask closer to the right shape and size (but leave some room for adjustment). Sand, don’t try to cut. Note that the sharpie should have conveniently transferred off the balloon onto the Bondo:
Smooth layer
Apply another coat, but only put Bondo down on the rough patches, and use the putty knife to smooth things flat. This coat is for smoothness, so take your time, and really make sure you get bondo into all those gaps. Wait for it to harden.
Finish sand
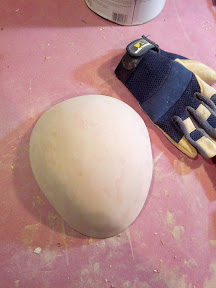
Sand again with 80 grit. You should end up with a nice smooth surface. If it’s necessary, repeat the above step for a fourth coat. (I didn’t feel the need.)
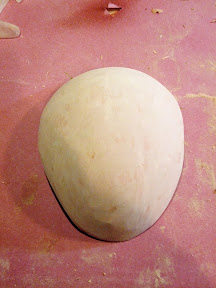
Hand sand with 100 grit or finer to get a nice smooth finish. The remaining discolorations are from inconsistent Bondo batch mixes, not from roughness.
 |
 |
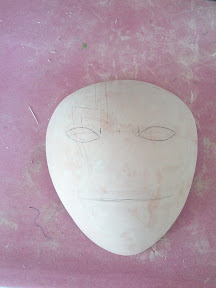
The mask is now built, and should’ve only taken 2-3 hours including drying time.
Features
Draw and cut out the eyes with the Dremel. Use a cutting bit to make a center incision, then use a sanding bit to shape the eyes. Use the triangular file to get the corners of the eyes. Also, sand the mask shape to exactly where you want it to be.
 |
 |
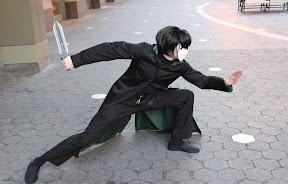
Paint
Paint. I used spray primer and flat white paint, and then acrylic paint for the lightning bolt and mouth. This step took me a long time (I’m no good with a paintbrush and had to reprimer and start over several times.)
 |
 |
Attach
Add anchors to be able to wear the mask. I used two magnets on the back, which attach to a band that goes around my head under my wig. If you’re going to do that, glue before you paint, otherwise the glue will bond to the paint, and the magnets will come off with the paint. (As I learned the hard way, and you can see in the photo here.)
 |
 |
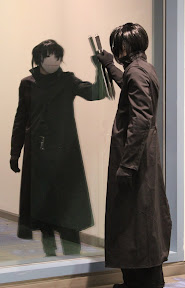
Sample photos
 |
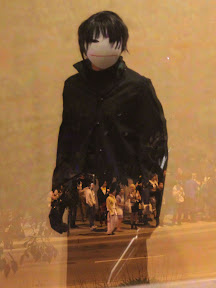 |
What could be done better?
A balloon is not a perfect representation of the shape of the mask. Really, you want something that curves more around the vertical axis than around the horizontal. Maybe the back of a mannequin head? You can tell that the mask extends a bit far to the sides of my face because of that. On the other hand, the anime is wildly inconsistent (and physically impossible, of course), and this shape is a reasonable approximation.
I’m not perfectly happy with my painting job, either, but this is about my fifth attempt, and I’m not about to reprimer/paint again.
I have to say I think you have the best way to make the Hei mask ^_^ it looks a whole lot better than the papre ones. I believe I’ll give this one a try and thanks for making a guide to make the mask.
Glad you found it useful. 🙂
Works great, but the only problem is that the Bondo seems to somehow pop the balloon if you let it sit more than an hour. Don’t have a enough Bondo or balloons to do a thorough test of this, though.
Huh, that sucks. Thanks for telling me about it, though. 🙁
I’m not sure why that is; I didn’t have this issue when I was doing it. Perhaps it’s a different type of balloon? Interesting that it took an hour, too – Bondo usually is fully set quicker than that, if I remember correctly (I haven’t worked with it in a little while).
If you figure out a solution, please let me know, and I’ll annotate the post accordingly.
I had to let it sit for an hour thanks to circumstances, but it sort of looked like the part of the balloon in contact with the Bondo had melted slightly. Could be that a temperature change happened and caused the balloon to expand or contract in certain areas and burst. I think it was a latex balloon, but I have no way of knowing for certain at this point.
I’m currently attempting this again a large, cylindrical glass wine jug as a base. If that fails, my backup plan is to cannibalize the polycarbonate insert of a cheap 3M faceshield and use that as a template for the Bondo (or maybe even a permanent backing).
On another note, I noticed that a scroll saw at low speed does a rather excellent job of cutting through cured Bondo. (Tested this while waiting for the second attempt to dry)
The glass jug method worked fairly well, and the inside of the mask-to-be is ridiculously smooth. Peeling it off was tricky, though, and required a bit of careful work with a sharp knife. The peeling could probably be made easier by taping a grid of wires or maybe some screening to the part of the jug where the Bondo is to be applied.
Oh yes, melting totally makes sense. Bondo heats up significantly when setting. I must’ve used a type of balloon that wasn’t susceptible to it. I’ll make a note in the writeup.
Peeling it off a glass jug sounds extremely tough. I’m glad you were successful. A thin material between the jug and the bondo might work, too. Not sure what, though. It needs to not let bondo through, but also not melt.
I’d imagine fine chickenwire or aluminum screening would do the trick there
Yep, quite possible. Or even some kind of light cloth.
I just used the mask in cosplay for the first time last week, and I have to say, that magnet and headband method works really well! Thanks again for posting this tutorial.
[PS: It might also bear mentioning that when I painted it (using lacquer-based spray paint), I actually didn’t even need to prime it. A few months later and the paint is showing no signs of flaking or peeling.]